[Unity] InputManagerの設定情報をスクリプトから参照する

UnityのInputManagerの設定情報をスクリプトから参照する方法のご紹介です。
キー割り当ての変更等、既存のInput機能を拡張したい場合などでお役に立てるかと思います。
■実装方針
InputManagerの設定情報はメニューの「Edit」→「Project Settings」→「Input」から閲覧・編集できます。
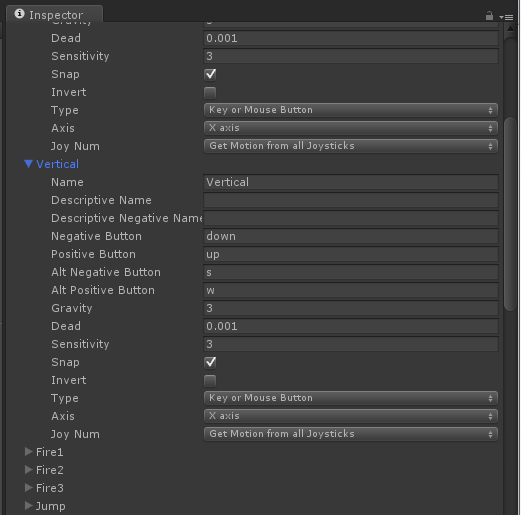
しかし、これらの設定情報を実行時に取得する手段は(通常では)ありません。
そこで、エディタ拡張を用いて上記設定情報を実行時に取得できる形にします。
InputManagerの設定情報が更新されるたびに、設定情報を定義するスクリプトを動的生成すれば実現できます。
スマートな方法ではないかもしれませんが、今回はこれで難を凌ぎます。
■スクリプト
下記スクリプトをAssets配下の適当な場所にインポートします。
InputManagerGenerator.cs
using UnityEngine;
using UnityEditor;
using System;
using System.Collections;
using System.IO;
using System.Text.RegularExpressions;

//-------------------------------------------------------------------------
// InputManagerの設定情報を自動生成するクラス
//-------------------------------------------------------------------------
public class InputManagerGenerator : AssetPostprocessor {
    // Axisタイプ
    private enum AxisType {
        KeyOrMouseButton = 0,
        MouseMovement = 1,
        JoystickAxis = 2
    };

    // Axis情報
    private class InputAxis {
        public string name;
        public string descriptiveName;
        public string descriptiveNegativeName;
        public string negativeButton;
        public string positiveButton;
        public string altNegativeButton;
        public string altPositiveButton;
        public float gravity;
        public float dead;
        public float sensitivity;
        public bool snap = false;
        public bool invert = false;
        public AxisType type;
        public int axis;
        public int joyNum;
    };

    // InputManagerクラステンプレート
    private const string TEMPLATE = @"// This file is generated by InputManagerGenerator.
using UnityEngine;
using System.Collections;

public static class InputManager {{
    public enum AxisType {{
        KeyOrMouseButton = 0,
        MouseMovement = 1,
        JoystickAxis = 2
    }};
    public class InputAxis {{
        public string name;
        public string descriptiveName;
        public string descriptiveNegativeName;
        public string negativeButton;
        public string positiveButton;
        public string altNegativeButton;
        public string altPositiveButton;
        public float gravity;
        public float dead;
        public float sensitivity;
        public bool snap = false;
        public bool invert = false;
        public AxisType type;
        public int axis;
        public int joyNum;
    }};

    public static InputAxis[] Config = new InputAxis[] {{
{0}    }};
}}
";
    // Axis定義
    private const string INPUT_AXIS_ELEM = @"        new InputAxis {{
            name = ""{0}"",
            descriptiveName = ""{1}"",
            descriptiveNegativeName = ""{2}"",
            negativeButton = ""{3}"",
            positiveButton = ""{4}"",
            altNegativeButton = ""{5}"",
            altPositiveButton = ""{6}"",
            gravity = {7}f,
            dead = {8}f,
            sensitivity = {9}f,
            snap = {10},
            invert = {11},
            type = AxisType.{12},
            axis = {13},
            joyNum = {14},
        }},
";

    //-------------------------------------------------------------------------
    // 変更されたInputManager.assetの情報からInputManager.csを作成する
    //-------------------------------------------------------------------------
    private static void OnPostprocessAllAssets(string[] importedAssets, string[] deletedAssets, string[] movedAssets, string[] movedFromPath) {
        // InputManagerの変更チェック
        var inputManagerPath = Array.Find(importedAssets, path => Path.GetFileName(path) == "InputManager.asset");
        if ( inputManagerPath == null ) {
            return;
        }

        // InputManagerの設定情報読み込み
        var serializedObject = new SerializedObject(AssetDatabase.LoadAllAssetsAtPath(inputManagerPath)[0]);
        var axesProperty = serializedObject.FindProperty("m_Axes");

        var axes = new InputAxis[axesProperty.arraySize];

        for ( int i = 0 ; i < axesProperty.arraySize ; ++i ) {
            var axis = new InputAxis();
            var axisProperty = axesProperty.GetArrayElementAtIndex(i);

            axis.name = GetChildProperty(axisProperty, "m_Name").stringValue;
            axis.descriptiveName = GetChildProperty(axisProperty, "descriptiveName").stringValue;
            axis.descriptiveNegativeName = GetChildProperty(axisProperty, "descriptiveNegativeName").stringValue;
            axis.negativeButton = GetChildProperty(axisProperty, "negativeButton").stringValue;
            axis.positiveButton = GetChildProperty(axisProperty, "positiveButton").stringValue;
            axis.altNegativeButton = GetChildProperty(axisProperty, "altNegativeButton").stringValue;
            axis.altPositiveButton = GetChildProperty(axisProperty, "altPositiveButton").stringValue;
            axis.gravity = GetChildProperty(axisProperty, "gravity").floatValue;
            axis.dead = GetChildProperty(axisProperty, "dead").floatValue;
            axis.sensitivity = GetChildProperty(axisProperty, "sensitivity").floatValue;
            axis.snap = GetChildProperty(axisProperty, "snap").boolValue;
            axis.invert = GetChildProperty(axisProperty, "invert").boolValue;
            axis.type = (AxisType)GetChildProperty(axisProperty, "type").intValue;
            axis.axis = GetChildProperty(axisProperty, "axis").intValue;
            axis.joyNum = GetChildProperty(axisProperty, "joyNum").intValue;

            axes[i] = axis;
        }

        // InputManagerクラスを生成
        string inputAxis = "";
        foreach ( var axis in axes ) {
            inputAxis += string.Format(INPUT_AXIS_ELEM,
                axis.name,
                axis.descriptiveName,
                axis.descriptiveNegativeName,
                axis.negativeButton,
                axis.positiveButton,
                axis.altNegativeButton,
                axis.altPositiveButton,
                axis.gravity.ToString(),
                axis.dead.ToString(),
                axis.sensitivity.ToString(),
                axis.snap.ToString().ToLower(),
                axis.invert.ToString().ToLower(),
                axis.type.ToString(),
                axis.axis.ToString(),
                axis.joyNum.ToString());
        }

        var result = string.Format(TEMPLATE, inputAxis);

        // ファイルに保存
        var inputManagerResult = Application.dataPath + "/InputManager.cs";
        var sr = new StreamWriter(inputManagerResult);
        sr.Write(result);
        sr.Close();

        // 生成したInputManager.csをインポート
        AssetDatabase.ImportAsset(inputManagerResult, ImportAssetOptions.ForceUpdate);
    }

    //-------------------------------------------------------------------------
    // 子プロパティ取得
    //-------------------------------------------------------------------------
    private static SerializedProperty GetChildProperty(SerializedProperty parent, string name) {
        SerializedProperty child = parent.Copy();
        child.Next(true);
        do {
            if ( child.name == name ) return child;
        }
        while ( child.Next(false) );
        return null;
    }
}
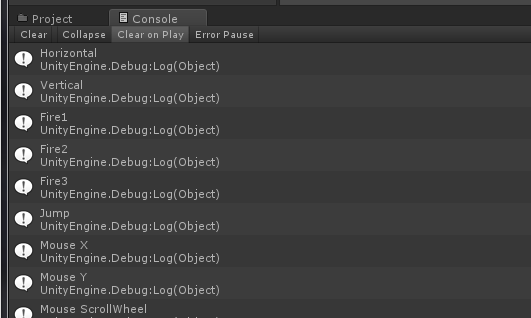
これで、InputManagerの設定情報を変更してシーンを保存するとInputManager.csがAssetsフォルダ配下に作成されます。
動的生成された設定情報には以下のようにスクリプトから参照できます。
using UnityEngine;
using System.Collections;

public class TestInput : MonoBehaviour {
    void Start() {
        // InputManagerで設定された名前を一覧表示
        foreach ( var config in InputManager.Config ) {
            Debug.Log(config.name);
        }
    }
}
設定情報の動的生成はスクリプトから力技で行っていますが、導入そのものはスクリプトファイルをひとつプロジェクトに追加するだけなので簡単かと思います。
今回紹介した内容を元に、後日ゲームパッドのキー割り当ての変更方法について紹介できれば・・・と考えています。
![[お知らせ] 活動再開、そして2021年に向けて](https://ftvoid.com/blog/wp-content/uploads/2018/09/profile-250x154.png)
![[お知らせ] 独りゲームジャムをやります](https://ftvoid.com/blog/wp-content/themes/dp-colors/img/post_thumbnail/noimage.png)